
To delete repeats in Excel, select your data, go to Data → Remove Duplicates, choose the columns that define a duplicate, and click OK. Excel calls repeated entries “duplicates,” so that is the term you will see in menus and messages. It keeps the first matching row and deletes the rest.
That speed comes with a catch. Remove Duplicates permanently deletes whole rows, not just cells. So it pays to find and review your repeats first, and to save a backup copy before you click anything.
This guide shows you the quick method, what Excel really does behind the scenes, and safer options when you don’t want to touch your original data.
How to Delete Repeats in Excel Quickly
Here is the fastest way to delete repeats in Excel using the built-in tool:
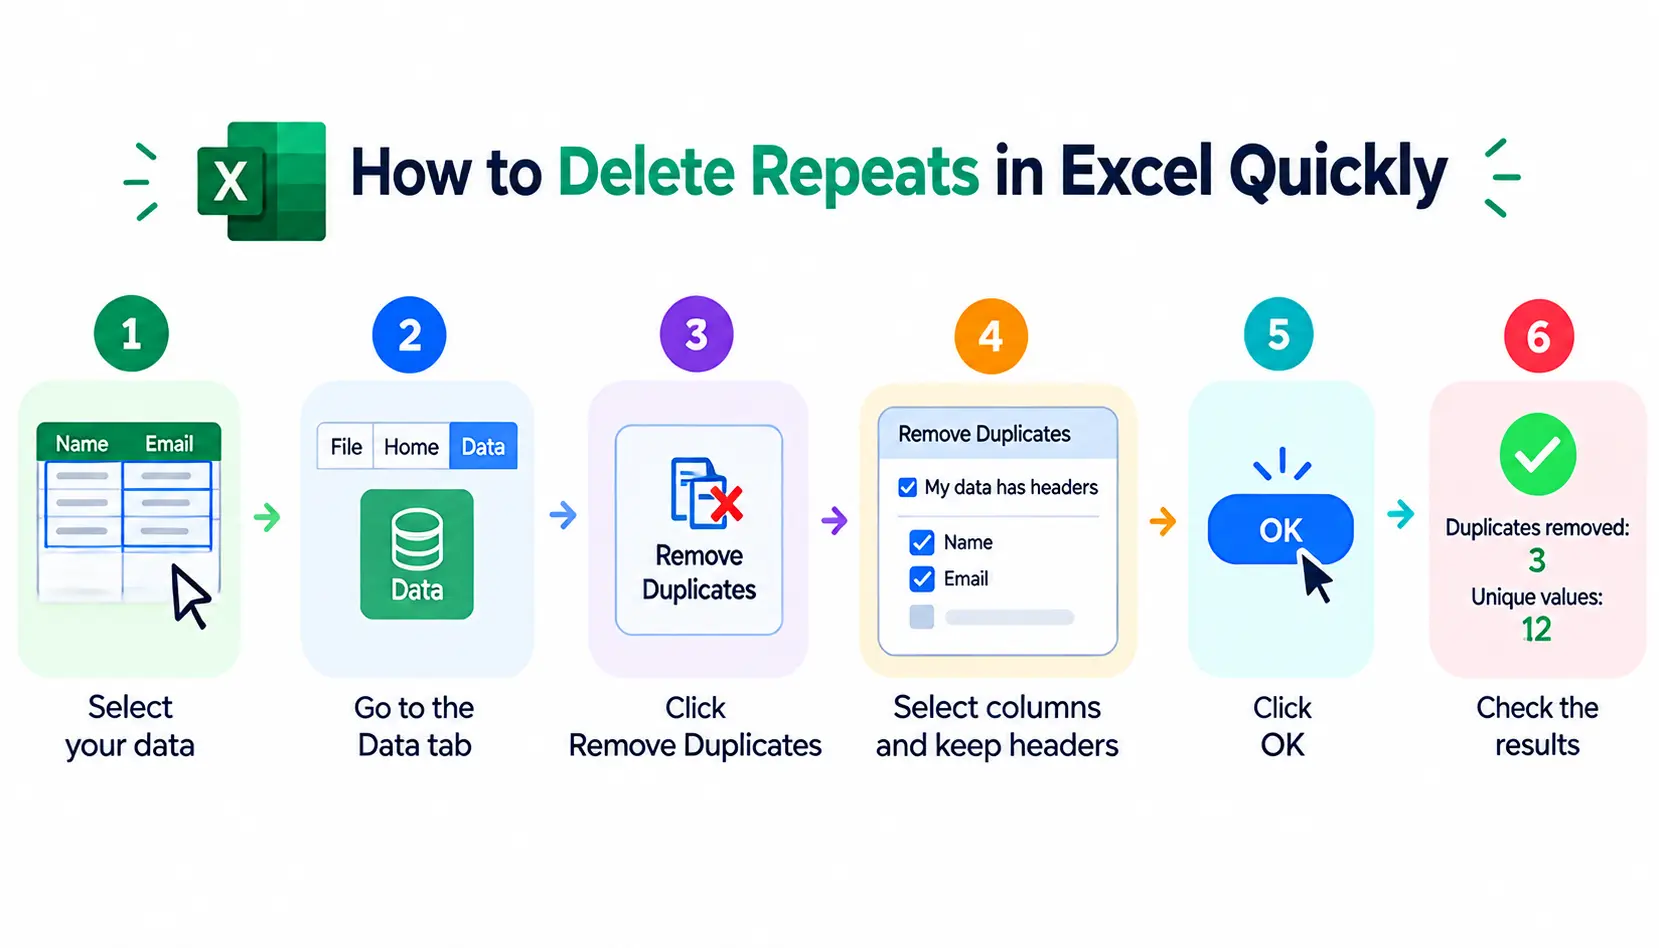
- Click any cell in your data, or select the full range, including the header row.
- Go to the Data tab.
- Click Remove Duplicates in the Data Tools group.
- Tick the columns Excel should compare, and keep My data has headers checked.
- Click OK.
- Read the message Excel shows. It tells you how many duplicates are removed and how many unique values remain.
That is the whole process. The details below help you avoid the mistakes that cost people data.
Step 1: Select your data
Select the full dataset, headers included. If you click a single cell inside a clean block of data, Excel usually detects the range for you. But I prefer to select it manually.
Why? Excel only checks what you select. If a blank row or column splits your data, Excel may stop at the gap and leave part of your list unchecked. A quick Ctrl+A inside the data confirms the whole range is highlighted.
Step 2: Open Remove Duplicates
Go to Data → Remove Duplicates. A dialog box opens with a list of your column headers, each with a checkbox.
The checkbox for My data has headers matters. If it is ticked, Excel treats row one as labels and does not compare it with your data. If your list has no header row, untick it.
Step 3: Choose which columns define a duplicate
This choice decides what Excel counts as a repeat. You have three options:
- All columns: A row is a duplicate only if every cell matches another row. This is the safest choice.
- One column: Excel compares only that column. Rows with the same value there count as duplicates, even if other columns differ.
- Multiple columns: Rows count as duplicates only when all the ticked columns match together.
Think of the ticked columns as a “key.” A customer ID alone is a good key. A first name alone is not, because two different people can share it.
Step 4: Confirm the duplicates
Click OK. Excel deletes the duplicate rows and shows a message such as “3 duplicate values found and removed; 12 unique values remain.”
Excel keeps the first occurrence it finds, reading from top to bottom. Everything below it that matches gets removed. If the result looks wrong, press Ctrl+Z right away to undo.
What Happens When You Remove Duplicates in Excel?
Many people click the button without knowing exactly what it does. Three behaviors explain most surprises.
Excel keeps the first occurrence
Excel scans your rows from top to bottom. The first row with a given key stays. Any later row with the same key is deleted.
This means your sort order decides which record survives. Suppose a customer appears twice, once with an old phone number at row 5 and once with a new number at row 80. Excel keeps row 5 and deletes the newer record. To control the outcome, sort your data before you remove duplicates (more on that later).
Selecting one column can delete an entire row
This is the warning that trips up most beginners. If you tick only one column, Excel compares only that column, but it deletes the whole row.
Here is a small example:
| Name | Phone | Company | |
| Sarah Khan | sarah@example.com | 555-1001 | ABC |
| Sarah Khan | sarah@example.com | 555-2002 | ABC Group |
If you remove duplicates based on Email only, Excel treats these as the same record. It keeps the first row and deletes the second, including the second phone number and company name. Nothing warns you that the deleted row held different details.
What happens when you select multiple columns?
When you tick several columns, Excel only removes a row if all of those values match another row. One difference is enough to keep both.
Before, with Email and Company ticked:
| Company | |
| sarah@example.com | ABC |
| sarah@example.com | ABC |
| sarah@example.com | XYZ |
After:
| Company | |
| sarah@example.com | ABC |
| sarah@example.com | XYZ |
The two ABC rows match on both columns, so one is removed. The XYZ row differs in Company, so it stays.
How to Find Repeats Before Deleting Them
I never delete from a list I haven’t looked at first. Finding repeats before you remove them takes a minute and prevents painful mistakes.
Highlight duplicates with Conditional Formatting
- Select the column or range you want to check.
- Go to Home → Conditional Formatting → Highlight Cells Rules → Duplicate Values.
- Pick a color and click OK.
Excel colors every repeated value. This method only highlights. It does not change or delete anything.
Keep in mind that Excel highlights every copy, including the first one. So you see all instances of a repeat, not just the extras.
Use COUNTIF to flag repeated values
A helper column gives you more control. In a new column next to your data, enter:
=COUNTIF(A2:A100,A2)>1
This returns TRUE when the value in A2 appears more than once in A2:A100, and FALSE when it appears only once. Copy the formula down, then filter the helper column for TRUE.
The dollar signs lock the range so it doesn’t shift as you copy the formula down. Change the range to match your own data.
Review the records before removing them
Once you can see the repeats, check them:
- Compare the important fields. Do the “duplicates” carry different phone numbers, amounts or dates?
- Sort if needed. Sorting by the key column puts repeats side by side, which makes review much easier. If you’re working with a long spreadsheet, you can also freeze the header row in Excel so your column names stay visible while reviewing duplicate records.
- Make a backup. Copy the sheet (right-click the tab and choose Move or Copy) or save a separate file.
Example: Remove Duplicate Emails From an Excel List
Let’s use a realistic mailing list:
| Name | Company | Phone | |
| Sarah | sarah@example.com | ABC | 555-1001 |
| John | john@example.com | XYZ | 555-1002 |
| Sarah | sarah@example.com | ABC | 555-1001 |
Remove duplicates based on Email
Select the data, open Data → Remove Duplicates, and tick only Email. Excel finds that row 3 repeats the email in row 1. It deletes row 3 and keeps rows 1 and 2.
The result is a clean list with one row per email address. That is exactly what you want for a mailing list.
Remove duplicates based on Email and Company
Now tick both Email and Company. In this sample, row 3 still matches row 1 on both fields, so the result looks the same.
The outcome changes when the data differs. If row 3 had listed Sarah at “DEF” instead, Excel would keep it, because the Email-and-Company pair is no longer identical. Adding columns makes the rule stricter, so fewer rows get removed.
How to Remove Duplicates From an Excel Table
Excel Tables (created with Ctrl+T) work a little differently from normal ranges. A normal range is just cells on a sheet. A Table is a structured object that expands automatically when you add rows and gets its own Table Design tab.
To delete repeats in a Table:
- Select a cell inside the table.
- Open Table Design on the ribbon.
- Select Remove Duplicates in the Tools group.
- Choose the columns to compare, then click OK.
The dialog box and the results are the same as with a normal range. The Data tab command also works inside a Table, so use whichever you find first.
How to Remove Duplicates Without Deleting Your Original Data
Sometimes you don’t want to destroy the source list. Excel offers several ways to build a clean copy instead.
Use the UNIQUE function
In Microsoft 365 and Excel 2021 or later, you can type:
=UNIQUE(A2:A100)
The function returns a separate list of unique values. Your original data stays untouched, and the new list updates when the source changes. Older versions of Excel don’t include UNIQUE.
The result “spills” into the cells below the formula, so leave that space empty.
Use Advanced Filter
Advanced Filter works in almost every version of Excel:
- Select your data, including headers.
- Go to Data → Advanced (in the Sort & Filter group).
- Choose Copy to another location.
- Pick a destination cell in the Copy to box.
- Tick Unique records only and click OK.
Excel pastes the unique records at the new location and leaves the source alone. Unlike UNIQUE, this is a one-time copy and does not update automatically.
When should you use each method?
| Method | Deletes source data? | Best for |
| Remove Duplicates | Yes | Quick cleanup |
| UNIQUE | No | Dynamic unique lists |
| Advanced Filter | No | Copying unique records |
| Power Query | No | Repeatable data cleaning |
How to Remove Duplicates With Power Query
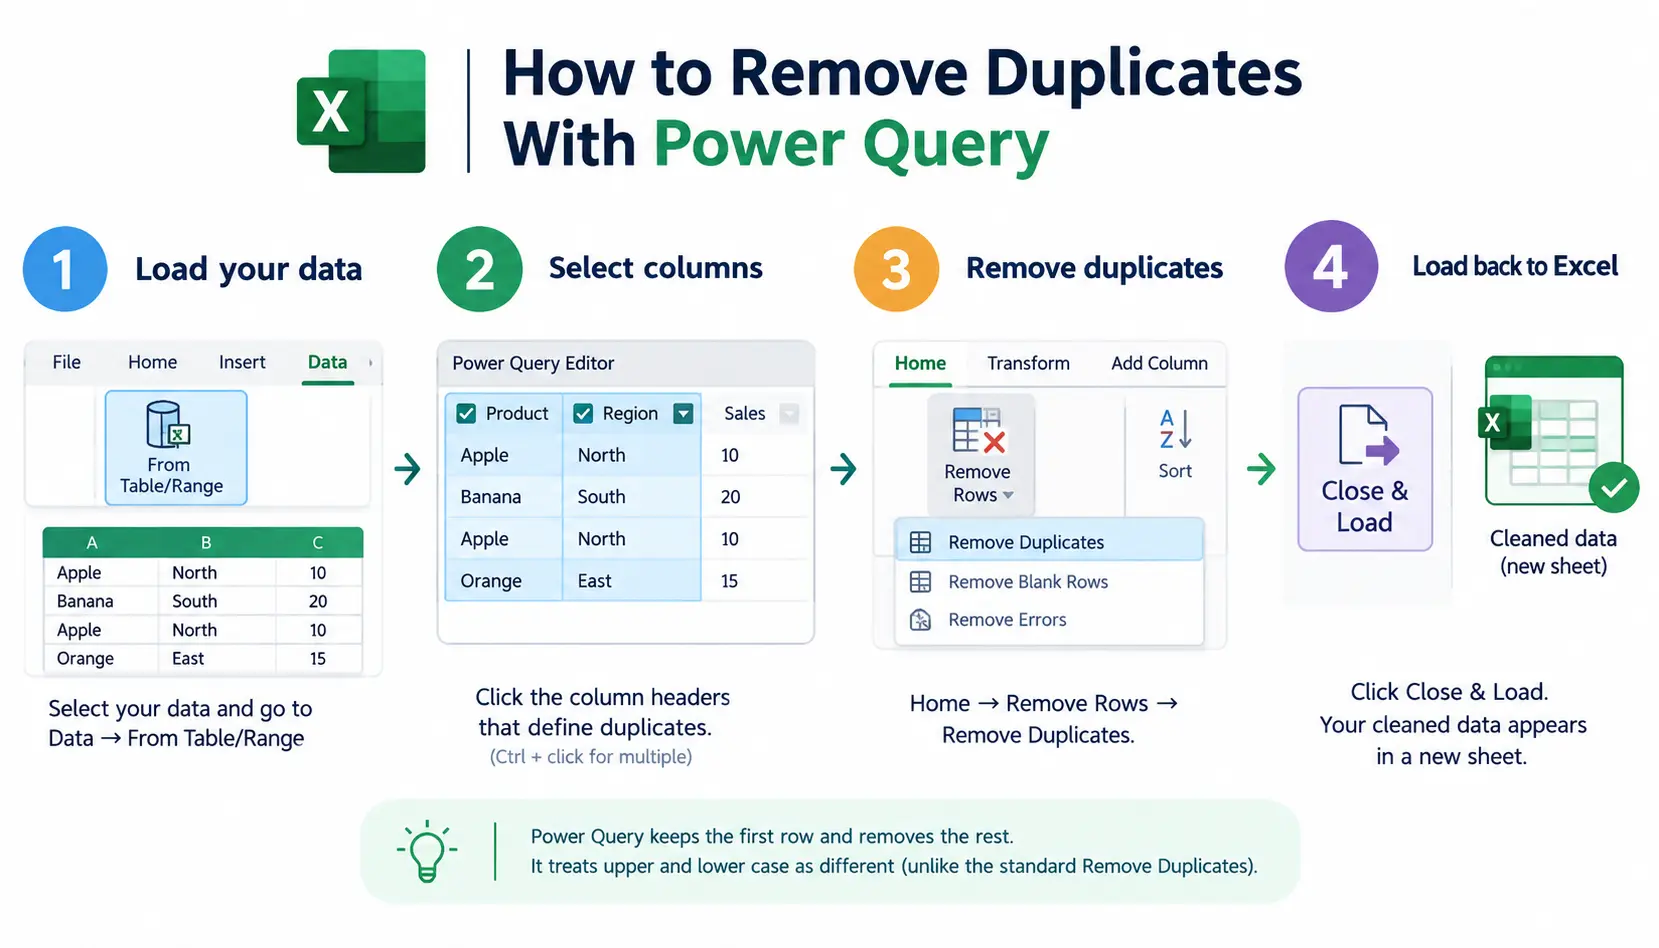
Power Query is Excel’s data-cleaning tool. It records each step you take, so you can refresh the same cleanup whenever new data arrives. Microsoft lists removing duplicates as one of its standard data-shaping steps.
Load your data into Power Query
Select a cell in your data and choose Data → From Table/Range. If your data isn’t a Table yet, Excel offers to convert it. The Power Query Editor opens in a new window.
Select the columns that define duplicates
In the editor, click the header of the column (or Ctrl+click several headers) that should identify a repeat. If you select nothing, Power Query compares all columns.
Choose Home → Remove Rows → Remove Duplicates
On the Home tab, open Remove Rows and click Remove Duplicates. Power Query keeps the first row for each key and removes the rest. One detail worth knowing: Power Query treats upper and lower case as different, while the standard Remove Duplicates command does not.
Load the cleaned data back into Excel
Click Close & Load. The cleaned data appears in a new sheet, and your original stays as it was.
This approach shines for recurring work, like a weekly sales export. Next time, paste in the new data, click Data → Refresh All, and the same cleanup runs again. If your recurring data arrives as CSV files, you can first convert CSV to Excel and then apply your duplicate-cleaning workflow.
Why Excel Doesn’t Remove Some Repeats
You ran Remove Duplicates, yet some repeats survived. This is common, and the cause is almost always small differences you can’t see at a glance. Excel compares values literally, so “almost the same” isn’t the same.
Extra spaces
A trailing space makes a different value. These two emails look identical but are not:
- john@example.com
- john@example.com (with a space at the end)
Fix this with a helper column using =TRIM(A2), then copy the results back as values and remove duplicates on the cleaned column.
Different punctuation
“ABC Ltd” and “ABC, Ltd.” mean the same company to you, but not to Excel. Standardize the punctuation with Find and Replace before you remove duplicates.
Different date formatting
Excel’s Remove Duplicates compares what a cell displays. Microsoft’s documentation notes this behavior: if two cells hold the same date but display it in different formats, such as 03/04/2026 and 3-Apr-2026, they may not count as duplicates. Apply one consistent format first.
Spelling variations
“Jon” and “John” are different strings. Excel won’t connect them, even if they obviously belong to the same person.
Near-duplicate records
Remove Duplicates only catches exact matches. It is not a fuzzy-matching tool. Finding records that are similar but not identical is a separate problem known as record linkage, and it needs different tools, such as the Fuzzy Matching options in Power Query’s merge feature or a dedicated data-cleaning tool. For the general idea of removing repeated data, see data deduplication on Wikipedia.
How to Choose Which Duplicate Record Excel Keeps
Excel always keeps the first row it meets. That gives you a simple lever: control the order, and you control the winner.
Sort before removing duplicates
Say your list has a Last Updated column and you want the most recent record for each customer. Sort by Last Updated from newest to oldest. Then run Remove Duplicates on the customer key. The newest row sits first, so Excel keeps it.
Keep the oldest record instead
Reverse the sort. Sort Last Updated from oldest to newest, then remove duplicates. Now the oldest record survives. This is useful when you want the original sign-up date or first purchase.
Why this matters for customer and sales data
Keeping the wrong record has real costs. An outdated email means a bounced campaign. An old address means a returned package. In a sales file, the wrong row can mean the wrong price or status.
A 30-second sort is cheap insurance.
Common Mistakes When Deleting Repeats in Excel
These are the errors I see most often when people delete repeats in Excel for the first time.
Selecting the wrong columns
Ticking too few columns deletes rows that only look like repeats. Ticking too many leaves real repeats behind. Decide what uniquely identifies a record before you click.
Deleting before creating a backup
Ctrl+Z works only right after the action. Once you save and close, the deleted rows are gone. Always copy the sheet first.
Removing duplicates from filtered data without checking the range
Filters can hide rows, and hidden rows may still be part of the range Excel checks. Don’t assume the tool only sees what you can see. Copy the visible data to a new sheet first, or clear the filter and review the full range.
Assuming similar-looking values are duplicates
Two cells that look the same may differ by a space, a character or a format. Clean the data first, as shown above.
Removing intentional repeats
Some repeats are real. A customer who bought three times should appear three times in a sales log. Removing those rows would erase real transactions. Ask yourself whether each row represents a separate event before you treat repeats as errors.
Forgetting that the entire row can be removed
Excel compares only the columns you tick, but it deletes the complete row. Always check what else lives in that row before you confirm.
If you want to see how other users handle tricky cases, the excel community on Reddit is a good place to ask or search for examples.
Remove Duplicates vs Highlight Duplicates vs UNIQUE
Here is a quick side-by-side to help you pick the right tool:
| Feature | Purpose | Changes original data? |
| Remove Duplicates | Delete duplicate records | Yes |
| Conditional Formatting | Find and highlight duplicates | No |
| UNIQUE | Create a unique list | No |
| Advanced Filter | Extract unique records | No |
| Power Query | Repeatable data transformation | Usually no |
If you’re unsure, start with Conditional Formatting to look, then decide whether you need a deletion or a clean copy.
Frequently Asked Questions About Deleting Repeats in Excel
1. How do I delete repeated values in Excel?
Select your data, go to Data → Remove Duplicates, choose the columns to compare, and click OK. Excel deletes the repeated rows and keeps the first occurrence.
2. How do I remove duplicate rows in Excel?
Use the same steps and tick all columns. A row is removed only when every cell in it matches another row.
3. How do I delete duplicates based on one column?
In the Remove Duplicates dialog, untick everything except the column you want to compare. Remember that Excel deletes the whole row, not just that cell.
4. How do I remove duplicates based on multiple columns?
Tick each column that together defines a duplicate, such as Email and Company. Excel removes a row only when all ticked columns match.
5. Does Excel keep the first or last duplicate?
Excel keeps the first occurrence, reading from top to bottom. Sort your data first if you want a specific record to survive.
6. How do I find duplicates before deleting them?
Use Home → Conditional Formatting → Highlight Cells Rules → Duplicate Values, or a helper column with =COUNTIF(A2:A100,A2)>1.
7. How do I remove duplicates without changing the original data?
Use the UNIQUE function, Advanced Filter with Copy to another location, or Power Query. Each one produces a separate clean list.
8. Why does Excel leave some duplicates behind?
Usually because the values differ in small ways: extra spaces, punctuation, date formats or spelling. Excel only matches values that are exactly the same as displayed.
9. Can I undo Remove Duplicates?
Yes, press Ctrl+Z immediately after running it. Once you close the file, you can’t recover the deleted rows unless you keep a backup.
10. What formula finds duplicates in Excel?
COUNTIF is the most common choice. =COUNTIF(A2:A100,A2)>1 returns TRUE for any value that appears more than once in the range.
Conclusion
To delete repeats in Excel, use Data → Remove Duplicates, pick the right columns, and let Excel keep the first match. It is fast, but it is also permanent.
So find the repeats first, sort to control which record stays, clean up spaces and formats, and keep a backup. When you want to keep your source data safe, reach for UNIQUE, Advanced Filter or Power Query instead. A few careful minutes now saves you from rebuilding a list later. If you want background on the tool itself, Microsoft Excel on Wikipedia gives a general overview.